How to build a QR code interface in React native app

Are you looking for How to build a QR code interface in a React Native app With the use of the React Native framework, React Native development companies have been successfully integrating different features into apps. In this tutorial blog, we will see how React native app developers build a QR code interface.
What is the need for a QR code scanner?
QR code scanner is useful for scanning barcodes and fetching information about the product. You can also see waiters asking you to scan the provided bar code for the menu. Nowadays, QR code scanners are available on most smartphones.
So let’s start with the building process.
Third-party React Native library
For this project, I am using the React Native CLI tool. It supports third-party native libraries. I will be using two third-party plugins to access the relevant React Native components, such as the QR code scanner and RNCamera. The main reason to use these plugins is to simplify the code. The two third-party packages are react-native-QR code-scanner and react-native-camera. Please note, that you have to check the version of this library and its compatibility criteria with each other. Also, to enable the QR code scanner in your app, you have to get the RNCamera from react-native-camera. Further to activate the camera, you need to ask for permission. Consider the following line for the permission of the camera.
<uses-permission android:name=”android.permission.CAMERA” />
You can find all other dependencies stored in the root directory of the app in the package.json folder. Also, find other permissions sought for the project in the android/app/src/main/AndroidManifest.xml file.
Pre-acquired learnings
Get your development system compatible with the React Native environment. For this, you have to install the software. Check this article for further details. Note that you have to get the software only mentioned under the heading React Native CLI of the article.
Secondly, you have to become familiar with the React Native components and their customization. Check this tutorial blog for a detailed explanation.
As we are done discussing the prior concept needed for the project, let us get into the codebase which you will find in the app.js folder.
Code syntax and its specification
import {StyleSheet, Text, View, TouchableOpacity, Linking } from ‘react-native’
import React from ‘react’
import QRCodeScanner from ‘react-native-qrcode-scanner’;
import { RNCamera } from ‘react-native-camera’;
As you can see, the code snippets import StyleSheet, TouchableOpacity, Linking, View, and Text from react-native. It also imports React, QRCodeScanner, and RNCamera from react, react-native-qrcode-scanner, and react-native-camera respectively. You will see the use of these components later in the code lines.
export default function App() {
const onSuccess = e => {
Linking.openURL(e.data)
.catch(err =>
console.error(‘An error occured’, err)
);
console.log(e.data)
};
You need to use export default to export the App. The syntax opens the provided URL that was passed in as a parameter. Further, the .catch() function is used to catch errors if they occur. I used both consoles. error() and console.log() functions for different uses. console.log() is for printing the data users trying to fetch whereas console.error() function is for a printing error if any.
return (
<QRCodeScanner
onRead={onSuccess}
showMarker={true}
reactivate={true}
The code attempts to read the QR code on a given page and then reactivate it. The snippets show how you can use the QR code scanner component in the code lines. You have to integrate three properties onRead, showMarker, and reactivate with the component. These are passed as arguments for the QRCodeScanner component. onRead is set as onSuccess, showMarker is set as true, and reactivate is also set as true. You use showMarker to enable any form of marker around the scanning object.
flashMode={RNCamera.Constants.FlashMode.auto}
QRCodeScanner={true}
I used flashMode as the prop. The state of the FlashMode is auto, which means that the flashlight will be automatically activated when needed.
QRCodeScanner is also a prop considered as an argument to QRCodeScanner. It is set as true.
topContent={
<Text style={styles.centerText}>
Go to <Text style={styles.textBold}>wikipedia.org/wiki/QR_code</Text>{‘ ‘}
on your computer and scan the QR code.
</Text>
}
I used the <Text style={styles.centerText}> to design the topContent. The syntax further indicates the text ‘wikipedia.org/wiki/QR_code’ will be bold.
bottomContent={
<TouchableOpacity style={styles.buttonTouchable}>
<Text style={styles.buttonText}>OK. Got it!</Text>
</TouchableOpacity>
}
/>
)
}
The content at the bottom has a text element “OK. Got it!”. Also, with TouchableOpacity,
the code will create a completely opaque button.
const styles = StyleSheet.create({
centerText: {
flex: 1,
fontSize: 18,
padding: 32,
color: ‘#777’
},
textBold: {
fontWeight: ‘500’,
color: ‘#000’
},
buttonText: {
fontSize: 21,
color: ‘rgb(0,122,255)’
},
buttonTouchable: {
padding: 16
}
});
This code syntax shows how the StyleSheet has been used to style the centerText, textBold, buttonText, and buttonTouchable.
Navigating through the QR app
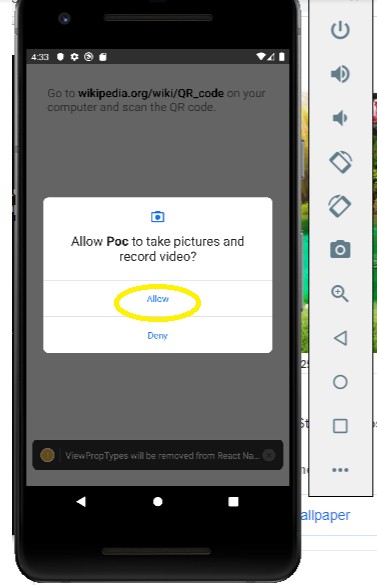
A few more steps and you will be able to run the app. Open a terminal in your VS Code editor. Run npm install and then run npx react-native run-android. This will activate the emulator in a few minutes. You will get a screen on the emulator as shown in image 1.

Allow all the permissions to start the QR code scanning app. Navigate the scanner by scrolling the mouse. The keys W, A, S, D, Q, and E are also used for navigation.
- How to Rephrase Text Using Android and iOS Apps
- Best Tools and Utility Apps on Android in 2022
- How to Avoid Unwanted WhatsApp Messages Without Blocking Someone
Final words
Programming and coding may sound difficult. With a high-utility framework like that of React Native, the process gets much easier. Take a sneak peek into the codebase for creating a QR code-scanning app.


