Here is How to Fix Shaky Footage in DaVinci Resolve Using the Stabilization Feature: Shaky footage can be a frustrating problem for any filmmaker or video editor. Fortunately, DaVinci Resolve offers a powerful stabilization feature that can help you fix shaky footage and create smooth, professional-looking videos.
How to Fix Shaky Footage in DaVinci Resolve Using the Stabilization Feature
Importing Your Footage
Firstly stabilizing your footage is to import it into DaVinci Resolve.
Here’s how:
- Open DaVinci Resolve and create a new project.
- Click on Media tab at the bottom of screen.
- Click on Import button and select footage you want to stabilize.
- Click on Open to import footage into your project.
Stabilizing Your Footage
Once you’ve imported your footage into DaVinci Resolve- it’s time to start stabilizing it. Here’s how:
- Select clip you want to stabilize in Media Pool.
- Drag the clip to timeline at bottom of screen.
- Click on clip in timeline to select it.
- Click on Inspector button in top-right corner.
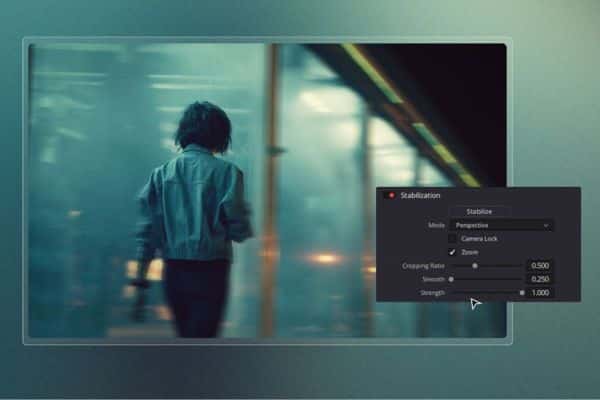
- Click on Stabilization tab in Inspector panel.
- Click on Enable Stabilization checkbox to activate stabilization feature.
- Adjust parameters in Stabilization tab to fine-tune stabilization effect.
Adjusting Stabilization Settings
There are several settings you can adjust to fine-tune stabilization effect in DaVinci Resolve. Here are some of most important ones:
Smoothness: This parameter controls level of smoothing applied to footage. Increase Smoothness value to create a smoother, more stable image. Be careful not to over-smooth footage, as this can make it look artificial.
Strength: This parameter controls strength of stabilization effect. Increase Strength value to create a more stable image. Be careful not to over-stabilize footage as this can make it look too static.
Crop: This parameter controls how much of image is cropped to create a stable frame. Increase the Crop value to crop more of image. Be careful not to crop too much, as this can reduce quality of image.
Analysis: This parameter controls how stabilization algorithm analyzes footage. There are two options: Position and Tripod. Position is default option and is suitable for most footage. Tripod is designed for footage shot on a tripod and can create a more stable image.
Rendering Your Stabilized Footage
Once you’ve adjusted stabilization settings to your liking it’s time to render your footage. Here’s how:
- Click on Deliver tab at bottom of the screen.
- Click on Add Job button to add your footage to render queue.
- Adjust render settings to your liking.
- Click on Start Render button to begin rendering your footage.
FAQ
Q: What is stabilization feature in DaVinci Resolve?
A: Stabilization feature in DaVinci Resolve is a tool that can help you fix shaky footage and create smooth, professional-looking videos. It uses algorithms to analyze your footage and apply stabilization to create a stable frame.
Q: How do I access stabilization feature in DaVinci Resolve?
A: To access stabilization feature in DaVinci Resolve- select clip you want to stabilize in Media Pool, click on Inspector button in the top-right corner of screen, and click on Stabilization tab in Inspector panel.
Q: What settings can I adjust in stabilization feature in DaVinci Resolve?
A: You can adjust several settings in stabilization feature in DaVinci Resolve- Smoothness, Strength, Crop, and Analysis. These settings can help you fine-tune stabilization effect to your liking.
Q: Can I use stabilization feature in DaVinci Resolve to fix all types of shaky footage?
A: While stabilization feature in DaVinci Resolve can fix many types of shaky footage- it may not be able to fix all types of camera movement. Adjust settings carefully and experiment with different values to achieve the best results.
Q: How do I render my stabilized footage in DaVinci Resolve?
A: To render your stabilized footage in DaVinci Resolve, click on Deliver tab at the bottom of screen- click on Add Job button to add your footage to render queue, adjust render settings to your liking, and click on Start Render button to begin rendering your footage.
- How To Take The Ultimate iPhone Night Photos
- 15 Tips to Take Photos from Your Smartphone
- How To Hide Photos From Gallery?
Conclusion
Shaky footage can be a frustrating problem for any filmmaker or video editor but with DaVinci Resolve’s powerful stabilization feature, it’s easy to fix. By following steps outlined in this article you can stabilize your footage and create smooth, professional-looking videos.