To ensure efficient heat dissipation, it is important to properly remove and apply thermal paste on a CPU. Thermal paste also known as thermal compound or thermal grease, is a crucial component for maintaining optimal temperatures and performance in a CPU (Central Processing Unit). It serves as a medium between the CPU and the cooler, filling in microscopic imperfections and enhancing heat transfer. Here is how to remove the old thermal paste and properly apply a fresh layer, ensuring effective heat dissipation.
What is Thermal Paste?
Thermal paste is a thermally conductive compound that helps improve heat transfer between the CPU and the cooler. It consists of particles suspended in a viscous medium, typically silicone-based, that fills in the gaps and air pockets between the CPU’s integrated heat spreader (IHS) and the cooler’s contact surface. By eliminating these air pockets, thermal paste enhances thermal conductivity and prevents hotspots, allowing the cooler to effectively dissipate heat from the CPU.
Tools and Materials Needed:
Before we begin, gather the following tools and materials:
- Isopropyl alcohol (70 percent or higher purity)
- Cotton swabs or lint-free cloth
- Thermal paste (choose a high-quality, manufacturer-recommended thermal paste)
- Plastic spatula or credit card (for removing old thermal paste)
- Anti-static wrist strap (optional but recommended)
- Gloves (optional but recommended)
How to remove and apply thermal paste on a CPU
Step 1: Preparation and Safety Measures
- Ensure that your computer is turned off and unplugged from the power source.
- Put on an anti-static wrist strap to prevent static electricity discharge that can damage sensitive components.
- Consider wearing gloves to avoid skin contact with the thermal paste and to prevent oils from contaminating the surfaces.
Step 2: Removing the Old Thermal Paste
- Remove the CPU cooler according to the manufacturer’s instructions. Unscrew any mounting brackets or clips that hold the cooler in place.
- Gently twist the cooler to break the bond between the CPU and the cooler. If the thermal paste is hardened, you can use a blow dryer on low heat to soften it.
- Once the cooler is separated, use a plastic spatula or credit card to scrape off the old thermal paste from the CPU’s IHS and the cooler’s contact surface. Be careful not to scratch or damage any components.
- Dampen a cotton swab or lint-free cloth with isopropyl alcohol (IPA) and clean the CPU’s IHS and the cooler’s contact surface. Remove any residue and ensure they are completely clean and dry before applying the new thermal paste.
Step 3: Applying Fresh Thermal Paste
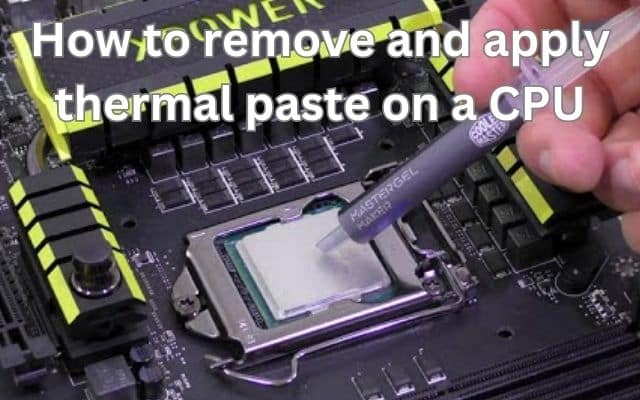
- Apply a small amount of thermal paste (about the size of a grain of rice) onto the center of the CPU’s IHS.
- Use a plastic spatula or a clean finger wrapped in a plastic bag to spread the thermal paste evenly across the entire IHS surface. Aim for a thin, uniform layer.
- Be careful not to use excessive thermal paste as it can lead to overflow and cause electrical shorts or interfere with other components.
- Once the thermal paste is applied, carefully place the cooler back onto the CPU. Ensure that it aligns with the mounting brackets or clips.
- Press down gently on the cooler to ensure the even distribution of the thermal paste. Follow the manufacturer’s instructions to securely fasten the cooler back in place.
Step 4: Final Checks and Testing
- Double-check that all screws or mounting brackets are properly tightened.
- Reassemble your computer, making sure all connections are secure.
- Power on your computer and monitor the CPU temperatures using monitoring software or BIOS settings.
- Run stress tests or intensive tasks to check the CPU’s thermal performance and ensure the temperatures remain within safe limits.
FAQ
Q: Why is it necessary to apply thermal paste on a CPU?
A: Thermal paste is necessary to fill in the microscopic imperfections and air gaps between the CPU and the cooler’s contact surface. It enhances heat transfer by improving the conduction of heat from the CPU to the cooler. Without thermal paste, air pockets can form, leading to poor heat dissipation and higher CPU temperatures.
Q: How often should thermal paste be replaced?
A: It is generally recommended to replace thermal paste every 1-2 years, or whenever you remove the CPU cooler. Over time, a thermal paste can dry out, lose its effectiveness, and become less efficient at conducting heat. Regularly replacing the thermal paste ensures optimal cooling performance.
Q: Can I reuse the old thermal paste?
A: It is not recommended to reuse old thermal paste. Once thermal paste has been applied and removed, its effectiveness diminishes, and it may not provide proper heat transfer. It is best to use fresh thermal paste for optimal cooling performance.
Q: How do I choose the right thermal paste?
A: When selecting thermal paste, consider factors such as thermal conductivity, longevity, and compatibility with your CPU and cooler. Look for high-quality thermal paste from reputable manufacturers and consider reviews and recommendations from trusted sources. It is often recommended to use thermal paste recommended by your CPU or cooler manufacturer.
Q: How much thermal paste should I apply?
A: The amount of thermal paste needed is relatively small. A general guideline is to apply a small pea-sized or rice-sized dot of thermal paste in the center of the CPU’s integrated heat spreader (IHS). This amount is usually sufficient to create a thin and even layer when the cooler is installed.
Q: Is there a specific technique for applying thermal paste?
A: There are different techniques for applying thermal paste, such as the dot method, line method, or spreading method. The most common method is the dot method, where a small dot of thermal paste is applied to the center of the CPU’s IHS, and the pressure from the cooler spreads it evenly. The key is to avoid using excessive thermal paste, as it can lead to overflow and interfere with other components.
Q: Can thermal paste damage my CPU?
A: When applied correctly, thermal paste does not damage the CPU. However, it is important to handle the CPU and thermal paste with care to avoid physical damage. Additionally, if thermal paste spills onto other components or if excessive thermal paste is used, it can cause electrical shorts or interfere with the CPU’s operation. Proper application and cleaning techniques minimize the risk of damage.
Q: Is it necessary to clean the old thermal paste before applying a new one?
A: Yes, it is crucial to clean the old thermal paste before applying a fresh layer. The old thermal paste can contain debris, dust, or dried-out particles that can hinder proper heat transfer. Use isopropyl alcohol and a lint-free cloth or cotton swab to thoroughly clean the CPU’s IHS and the cooler’s contact surface before applying the new thermal paste.
- How to Reclaim and Secure Your Hacked Telegram Account
- How to transfer emails from one Gmail account to another
- How To Delete An Old Musical Ly Account?
- How To Delete Hbo Max Account On Roku?
Conclusion:
Removing old thermal paste and applying a fresh layer is an essential maintenance task for ensuring optimal CPU temperatures. By following these and using high-quality thermal paste, you can improve heat transfer and prevent overheating issues. Remember to exercise caution, follow manufacturer instructions, and consult your computer’s user manual if needed. Proper thermal paste application can go a long way in preserving your CPU’s longevity and performance.