Here is How To Delete An Instance In Aws? Amazon Web Services (AWS) is a popular cloud computing platform used by businesses and individuals for hosting applications and services. When you no longer need an instance in AWS, you can delete it to stop incurring charges and free up resources.
In this article, we’ll guide you through the steps on how to delete an instance in AWS. Before we proceed, it’s important to note that deleting an instance is a permanent action and cannot be undone, so make sure to backup any data stored on it before proceeding.
How To Delete An Instance In Aws?
To delete an instance in Amazon Web Services (AWS), follow these steps:
- Log in to the AWS Management Console.
- Go to the EC2 (Elastic Compute Cloud) dashboard.
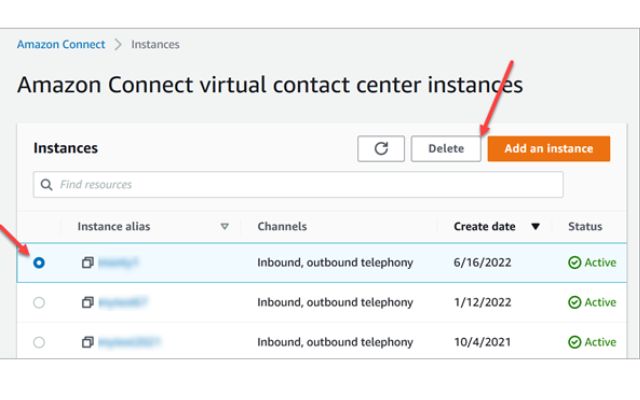
- Select the instance you want to delete.
- Right-click on the instance and select “Instance State,” then “Terminate.”
- A pop-up will appear to confirm the termination of the instance.
- Click “Yes, Terminate” to delete the instance.
Note: Before deleting an instance, make sure to backup any data stored on it or associate an Elastic IP address with the instance to preserve the public IP address. Also, deleting an instance will permanently terminate its use and you will not be able to recover it.
Identify active resources in your AWS account
To identify active resources in your AWS account, follow these steps:
- Log in to the AWS Management Console.
- Go to the AWS service that you want to check for active resources (e.g. EC2 for instances, RDS for databases, S3 for storage, etc.).
- In the respective service dashboard, view the list of resources.
- Identify the resources that are in a “running” or “active” state.
Note: Some AWS services, such as EC2, allow you to filter the list of resources based on their status, making it easier to find active resources. Additionally, some services, such as S3, have a feature that allows you to archive or delete infrequently used objects, helping you manage your active resources. To ensure that you are not incurring unnecessary charges, it is a good practice to regularly review your active resources and identify any that are no longer needed.
Delete or terminate EC2 resources
To delete or terminate EC2 (Elastic Compute Cloud) resources in AWS, follow these steps:
- Log in to the AWS Management Console.
- Go to the EC2 dashboard.
- Select the EC2 instances that you want to delete or terminate.
- Right-click on the instances and select “Instance State,” then “Terminate.”
- Confirm the termination of the instances by clicking “Yes, Terminate.”
Note: Before terminating EC2 instances, make sure to backup any data stored on it or associate an Elastic IP address with the instance to preserve the public IP address. Terminating an EC2 instance is a permanent action and cannot be undone, so make sure you no longer need the instance before proceeding. Also, it’s important to monitor the termination process to ensure that all associated resources (such as EBS volumes, security groups, and network interfaces) are terminated or deleted as well.
- How To Delete Reddit Posts?
- How To Delete An Old Musical Ly Account?
- Top 5 Uses of an AWS Consulting Company
Conclusion
Identifying and deleting or terminating unnecessary EC2 resources in AWS is an important step in managing your AWS account and reducing costs. By logging into the AWS Management Console and going to the EC2 dashboard, you can easily view and select the instances that you want to delete or terminate.
However, it is important to remember that terminating an EC2 instance is a permanent action, so make sure to backup any data stored on the instance and properly manage any associated resources before proceeding. By regularly reviewing your active resources and taking action to delete or terminate unnecessary ones, you can maintain a well-organized AWS environment and minimize costs.