How to Fix Ubuntu Update Error
A Guide to Troubleshooting and Fixing Update Errors on Ubuntu
Who hasn’t run into a problem while updating Ubuntu? In Ubuntu and other Linux distributions built on Ubuntu, update errors are frequent.
The solutions to a few typical Ubuntu update issues are shown below.
This article is part of the Ubuntu beginner series, which describes Ubuntu’s functionality so a new user can better grasp it.
If you encounter issues while updating your system, do not become alarmed. The mistakes are frequent, and the fix is simple.
You’ll discover how to correct those typical update issues.
Ubuntu Update Error/Problems
- Problem With Merge List
- Failed to download repository information
- Hash Sum mismatch
- Failed to fetch with error 404 not found
- GPG error: The following signatures couldn’t be verified
- Failed to download package files error
- BADSIG error
- Could not get lock /var/cache/apt/archives/lock
- Partial upgrade error
How to Fix Ubuntu Update Error
Problem With Merge List
There may be an “issue with MergeList” error when you run an update in the terminal, as shown below:
E:Encountered a section with no Package: header,
E:Problem with MergeList /var/lib/apt/lists/archive.ubuntu.com_ubuntu_dists_precise_universe_binary-i386_Packages,
E:The package lists or status file could not be parsed or opened.’
The file in the /var/lib/apt/lists directory became corrupt for unknown reasons.
To start over, you can run the update once more after deleting every file in this directory.
One by one, use the following commands:
sudo rm -r /var/lib/apt/lists/* Sudo apt-get clean && Sudo apt-get update
Your issue ought to be resolved.
Failed to download repository information
Many Ubuntu desktop users use the graphical software updater application to update their operating systems.
When updates for your system become available, you receive a notification, and you only need to click one button to begin downloading and installing the updates.
Well, that is generally what takes place.
The download of repository data was unsuccessful. Look into your internet connection.
It’s a strange error because it still advises you to verify your internet connection even though it’s probably fine.
It’s not an error in and of itself, therefore. It’s not likely related to the internet connection. But other than this false error notice, there is no meaningful information.
It’s time to don your detective hat and apply your brain power if you notice this error and your internet connection is functioning normally (as Hercule Poirot would say).
Here, you’ll need to use the command line. To open the terminal on Ubuntu, press the shortcut key combination Ctrl+Alt+T. Use this command in the place:
sudo apt update
Allow the command to expire. Watch the final three to four lines of its output. You will then know the actual cause of the Sudo apt-get update failing.
Hash Sum mismatch
The repair is the same as the one in the preceding issue if you encounter BADSIG an error, which is also a signature-related Ubuntu update issue, appears as follows: a Hash Sum mismatch error.
W:Failed to fetch bzip2:/var/lib/apt/lists/partial/in.archive.ubuntu.com_ubuntu_dists_oneiric_restricted_binary-i386_Packages Hash Sum mismatch,
W:Failed to fetch bzip2:/var/lib/apt/lists/partial/in.archive.ubuntu.com_ubuntu_dists_oneiric_multiverse_binary-i386_Packages Hash Sum mismatch,
E:Some index files failed to download. They have been ignored, or old ones used instead

A mismatched metadata cache between the server and your machine may be the source of the problem. To resolve it, issue the following commands:
sudo rm -rf /var/lib/apt/lists/* Sudo apt update
Failed to fetch with error 404 not found
A 404 not found error is sent if you attempt to add a PPA repository that is not accessible for your current Ubuntu version.
W: Failed to fetch http://ppa.launchpad.net/venerix/pkg/ubuntu/dists/raring/main/binary-i386/Packages  404  Not Found
E: Some index files failed to download. They have been ignored, or old ones used instead.

You added a PPA in the hopes of installing a programme, but your version of Ubuntu does not support it, thus you are left with the update error. For this reason, you should confirm in advance whether a PPA is accessible for your particular Ubuntu version. In the comprehensive PPA guide, I covered how to check the PPA's availability.

In any case, the solution is to delete the problematic PPA from your list of repositories. From the error message, take note of the PPA name.
GPG error: The following signatures couldn’t be verified
The following GPG error may also appear after adding a PPA: When you attempt to run an update in a terminal, the following signatures cannot be verified:
W: GPG error: http://repo.mate-desktop.org saucy InRelease: The following signatures couldn’t be verified because the public key is not available: NO_PUBKEY 68980A0EA10B4DE8
The following GPG error may also appear after adding a PPA:
When you attempt to run an update in a terminal, the following signatures cannot be verified:
sudo apt-key adv --keyserver keyserver.ubuntu.com --recv-keys 68980A0EA10B4DE8
Run the update once more when the key has been added, and everything should be great.
Failed to download package files error
A newer version of the software is available in this instance, but not all of the mirrors have received it. It is simple to solve if you are not utilizing a mirror by switching the software sources to the Main server. For more information on the failed-to-download package error, please read this article.
Change the download server to the Main server by going to Software & Updates and doing so there.
BADSIG error
BADSIG error, which is also a signature-related Ubuntu update issue, appears as follows:
W: A error occurred during the signature verification. The repository is not updated and the previous index files will be used. GPG error: http://extras.ubuntu.com precise Release: The following signatures were invalid: BADSIG 16126D3A3E5C1192 Ubuntu Extras Archive Automatic Signing Key
W: GPG error: http://ppa.launchpad.net precise Release:
The following signatures were invalid: BADSIG 4C1CBC1B69B0E2F4 Launchpad PPA for Jonathan French W: Failed to fetch http://extras.ubuntu.com/ubuntu/dists/precise/Release
All of the repositories have GPG signatures, but for some reason your system rejects them. Update the signature keys, please. Regenerating the apt packages list (with their signature keys) is the simplest method to do this, and it should produce the right key.
Use each of the following commands in the terminal one at a time:
cd /var/lib/apt
sudo mv lists oldlist
sudo mkdir -p lists/partial
sudo apt-get clean
sudo apt-get update
Could not get lock /var/cache/apt/archives/lock
When APT is utilized by another software, this error occurs. Consider that you are attempting to execute apt at the terminal while installing anything through the Ubuntu Software Center.
E: Could not get lock /var/cache/apt/archives/lock – open (11: Resource temporarily unavailable)
E: Unable to lock directory /var/cache/apt/archives/
Check to see if any other programs are using apt. Any software that deals with installing and uninstalling apps, such as Software Center, Software Updater, Software & Updates, or a command-running terminal, could be the culprit.
Close any further similar programs you can. Wait for a process to finish if one is currently underway.
If you are unable to discover any such programs, execute the command below to end all related processes that are currently running:
sudo killall apt apt-get
Partial upgrade error
This partial upgrade problem may be thrown by updating the terminal:
Not all updates can be installed
Run a partial upgrade, to install as many updates as possible
To resolve this issue, enter the following command in the terminal:
sudo apt-get install -f
Ubuntu not all updates can be installed
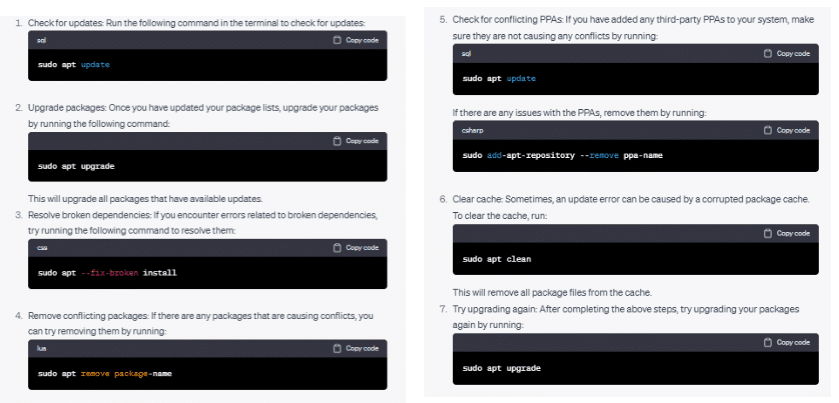
If you’re encountering issues where not all updates can be installed in Ubuntu, here are a few troubleshooting steps you can try:
Update package lists:
Open a terminal and run the following command:
sql
sudo apt update
This will refresh the package lists and ensure you have the latest information about available updates.
Upgrade installed packages:
After updating the package lists, run the following command:
sudo apt upgrade This will upgrade the installed packages to their latest versions. If there were any issues preventing the installation of certain updates, this command may help resolve them.
Check for broken dependencies:
Sometimes, broken or unmet dependencies can prevent updates from being installed. To check for any issues, use the following command:
css
sudo apt --fix-broken install
This command attempts to fix broken dependencies and enable the installation of pending updates.
Remove conflicting packages:
If certain packages are causing conflicts or blocking updates, you may need to remove them. Identify the problematic packages by reviewing error messages or logs and uninstall them using the:
arduino
sudo apt remove <package_name>
Clear the package cache:
Cached packages can sometimes interfere with the update process. To clear the package cache, run:
sudo apt cleanTry a different mirror:
It’s possible that the update source you’re using has synchronization issues. Change your software sources to use a different mirror by opening “Software & Updates” from the system settings and selecting a different server from the “Download from” dropdown.
Perform a distribution upgrade:
If you’re using an older version of Ubuntu, upgrading to the latest stable release may resolve update issues. Use the following command to perform a distribution upgrade:
arduino sudo do-release-upgrade If none of the above steps resolve the issue, it’s recommended to seek assistance from the Ubuntu community forums or consult the official Ubuntu documentation for further troubleshooting steps.
How do I fix a failed Ubuntu update?
The computer restarted, launching Ubuntu in recovery mode: As the PC boots up, keep the Shift key depressed. Select recovery mode after selecting the advanced settings in the GRUB boot menu that opens. Enable networking first in the recovery menu that occurs before selecting the choice to launch a root shell.
Can you upgrade Ubuntu without reinstalling it?
One of Ubuntu’s best features is the ability to upgrade from one version to the next. Without having to reinstall and set up your system, you gain access to the most recent software, including new security updates and all the enhanced technology that comes with a new version.
How do I reinstall Ubuntu without losing data?
To reinstall Ubuntu and preserve personal files, choose the Reinstall Ubuntu option on the Installation type screen. To format the hard drive and install a brand-new Ubuntu instance on the device, select the Erase Ubuntu and Reinstall option. To begin the installation, click the Install Now button.
Does upgrading Ubuntu delete files?
In the current system, all of your data and the vast majority of application settings stay unchanged. However, it is always advised to create a data backup on an external disc. You cannot downgrade your Ubuntu version after deciding to upgrade. You must completely reinstall Ubuntu to return to version 20.04 or 21.10.
Failed to download repository information Ubuntu
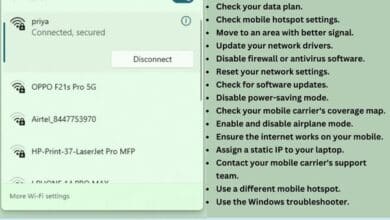
If you encounter the “Failed to download repository information” error in Ubuntu, it typically means that there is an issue with the software sources or network connectivity. Here are some steps you can take to address this problem:
- Check your internet connection: Ensure that you have a stable internet connection. Open a web browser and try visiting a website to verify connectivity.
- Refresh package lists: Open a terminal and run the following command to refresh the package lists:
- sql
sudo apt update - This command updates the information about available packages from the software sources.
- sql
- Choose a different mirror: Sometimes the default software source or mirror may be experiencing issues. You can try selecting a different mirror. Open “Software & Updates” from the system settings, go to the “Ubuntu Software” tab and choose a different server from the “Download from” dropdown.
- Check for proxy settings: If you are behind a proxy server, ensure that the proxy settings are correctly configured. Open the “Network” settings and check the proxy settings to match your network environment.
- Disable unnecessary software sources: If you have added third-party repositories or software sources, disable them temporarily to see if they are causing the issue. Open “Software & Updates” and navigate to the “Other Software” tab. Uncheck any unnecessary repositories and try updating again.
- Clear APT cache: In some cases, the APT cache may be corrupted. To clear it, run the following commands in the terminal:
sudo apt clean sudo apt autoclean
- Restart the system: A simple system restart can sometimes resolve temporary issues with repository information. Restart your computer and try updating again.
If the issue persists, it is recommended to seek help from the Ubuntu community forums or consult the official Ubuntu documentation for further troubleshooting steps.
Read More:
Ubuntu’s latest update problems
If you are experiencing problems with the latest update in Ubuntu, here are a few steps you can take to address the issues:
- Check for known issues: Visit the Ubuntu community forums, official Ubuntu documentation, or relevant support channels to see if there are any reported issues with the latest update. Other users may have encountered similar problems and found solutions or workarounds.
- Update packages and dependencies: Open a terminal and run the following commands to update your packages and their dependencies:
- sql
sudo apt update sudo apt upgrade
- sql
- Restart the system: Sometimes, a simple restart can resolve issues after an update. Restart your computer to ensure all updates are properly applied.
- Check for conflicting software: If you have installed third-party software or packages from external sources, they may conflict with the latest update. Consider removing or disabling them temporarily to see if the issues persist.
- Roll back the update: If the problems started after a specific update, you can try rolling back to a previous version. This can be done through the package manager or by using system restore points if they were created before the update.
- Verify hardware compatibility: In some cases, hardware-specific issues may arise after an update. Check if your hardware components are fully compatible with the latest version of Ubuntu. You can consult hardware manufacturer websites or Ubuntu’s hardware compatibility list for guidance.
- Seek community support: If the above steps do not resolve the problems, it can be helpful to seek assistance from the Ubuntu community. Post your issue on the Ubuntu forums or other support channels, providing detailed information about the problem, any error messages, and the steps you have already taken.
Remember to back up your important data before attempting any significant changes or system modifications. This ensures that your data remains safe in case unexpected issues occur during troubleshooting.
Ubuntu partial upgrade error
If you encounter a “partial upgrade” error in Ubuntu, it typically means that there are some unresolved dependencies or conflicts preventing the system from completing a full upgrade. Here’s what you can do to address this issue:
- Update package lists: Open a terminal and run the following command to update the package lists:
- SQL
sudo apt update
- SQL
- Upgrade installed packages: After updating the package lists, run the following command to upgrade the installed packages:
sudo apt upgrade
- Check for broken dependencies: Use the following command to check for any broken dependencies or unresolved issues:
- CSS
sudo apt --fix-broken install - This command attempts to fix any broken dependencies and resolve conflicts that may be causing the partial upgrade error.
- CSS
- Remove conflicting packages: If there are specific packages causing conflicts or preventing the upgrade, you may need to remove them. Identify the problematic packages from the error messages or logs, and uninstall them using:
- Arduino
sudo apt remove <package_name>
- Arduino
- Use the Dist-Upgrade command: If the above steps do not resolve the partial upgrade error, you can try the Dist-Upgrade command. Open a terminal and run the following command:
sudo apt dist-upgrade- The Dist-Upgrade command handles dependencies and conflicts more aggressively and may help complete the upgrade.
- Clean package cache: To ensure a clean upgrade process, clear the package cache by running:
- Copy code
sudo apt clean
- Copy code
- Restart the system: After attempting the above steps, restart your computer to ensure any changes take effect.
If the partial upgrade error persists despite trying these steps, it’s recommended to seek assistance from the Ubuntu community forums or consult the official Ubuntu documentation for further troubleshooting options specific to your situation.
- How to Fix Ubuntu Freezing
- How to Fix Ubuntu Boot Problem
- Important Basic Linux Commands for Beginners
- How to Add and Remove Users on Ubuntu
- How to install docker on Ubuntu 20.04 and 22.04
Conclusion
Encountering Ubuntu update errors can be frustrating, but there are various steps you can take to resolve them. If you’re facing signature-related problems, such as Hash Sum or BADSIG errors, you can try running the command: cd /var/lib/apt/lists/partial/in.archive.ubuntu.com ubuntu dists oneiric restricted binary-i386 Packages Hash Sum mismatch. Additionally, regenerating the apt packages list can also help resolve signature-related issues. You can check that your Ubuntu system stays updated and running smoothly.
FAQ
Q: What are some common Ubuntu update problems?
A: Some common Ubuntu update errors include: “Failed to fetch” errors, “Package xxx is not available” errors, “The following packages have unmet dependencies” errors, and “E: Sub-process /usr/bin/dpkg returned an error code” errors.
Q: Why do Ubuntu update errors occur?
A: Ubuntu update errors can occur due to a variety of reasons, including network connectivity issues, software conflicts or dependencies, corrupted package caches, and outdated repositories or package lists.
Q: What should I do if I encounter an Ubuntu update error?
A: The first step is to identify the specific error message and research its possible causes and solutions. Then, try the general steps outlined above, such as updating package lists, upgrading packages, fixing broken dependencies, and removing conflicting packages. If the error persists, seek further assistance from Ubuntu forums or support channels.
Q: How can I prevent Ubuntu update errors in the future?
A: You can prevent Ubuntu update errors by regularly updating your system, avoiding the use of conflicting or outdated repositories or PPAs, and avoiding software conflicts by uninstalling unused or unnecessary packages. You can also keep your system up-to-date by using stable and tested software versions.


🙏 🙏 ❤ ❤ Always be updated with computer tips, mobile tips, How to fix, tech reviews, and tech news on Rowdytech, or subscribe to the YouTube channel.