Learn how to turn on Windows 11 HDR to unlock the full potential of your display and enjoy stunning visuals. High Dynamic Range (HDR) technology enhances the visual experience by expanding the range of colors and improving contrast in images and videos. With its built-in HDR support, Windows 11 offers users a more immersive and vibrant viewing experience. We will cover how to enable HDR on your Windows 11 system. You can unlock the full potential of your HDR-compatible display and enjoy breathtaking visuals.
How to turn on Windows 11 HDR
Step 1: Check Hardware Compatibility:
Before enabling HDR on Windows 11, it’s essential to ensure that your hardware supports this feature. Verify that you have an HDR-compatible display connected to your computer. Look for a “DisplayHDR” certification: DisplayHDR 400, 600, or 1000, on your monitor’s specifications or manufacturer’s documentation to confirm its HDR capabilities.
Step 2: Update Graphics Drivers:
To enable HDR effectively, it’s crucial to have up-to-date graphics drivers installed on your Windows 11 system. Outdated drivers may cause compatibility issues or prevent HDR from functioning correctly. Visit the website of your graphics card manufacturer (such as NVIDIA, AMD, or Intel) and download the latest drivers compatible with Windows 11. Follow the manufacturer’s instructions to install the drivers and ensure your system is up to date.
Step 3: Enable HDR in Windows 11:
Once you have verified hardware compatibility and updated your graphics drivers, you can proceed with enabling HDR on Windows 11. Here’s how:
- Press the Windows key on your keyboard or click on the Start menu button located in the taskbar.
- Click on the “Settings” icon, resembling a gear. Alternatively, use the keyboard shortcut Windows key + I to open the Settings app directly.
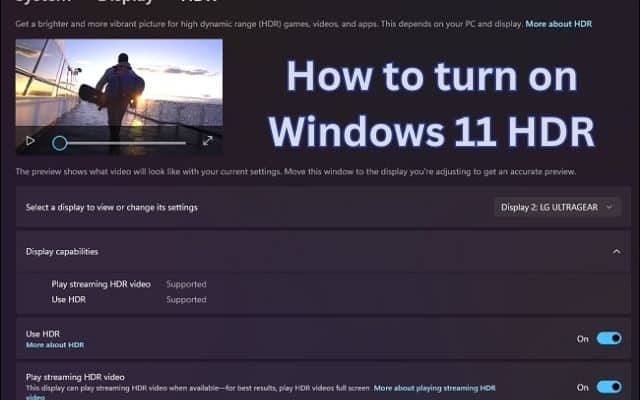
- In the Settings window, click on the “System” category.
- From the left-hand side menu, select “Display.”
- Scroll down until you find the “Multiple displays” section. Here, you will see a list of connected displays.
- Choose the HDR-compatible display on which you want to enable HDR. If you have multiple displays connected, select the correct one.
- Scroll further down to locate the “HDR” section.
- Toggle the switch next to “Use HDR” to the “On” position. This enables HDR on the selected display.
Step 4: Adjust HDR Settings (Optional):
Windows 11 provides additional settings to fine-tune your HDR experience. If you wish to customize the HDR settings, follow these steps:
- Right-click on the desktop and select “Display settings” from the context menu.
- In the Display settings window, scroll down and click on “Windows HD Color settings.”
- Here, you can adjust various HDR settings, including brightness, contrast, and color gamut, according to your preference and the capabilities of your display.
Step 5: Verify HDR Activation:
To ensure that HDR is successfully enabled on your Windows 11 system, follow these steps:
- Launch an HDR-supported game or application.
- Observe if the visuals appear more vibrant, with richer colors and improved contrast compared to non-HDR content.
- If the visuals look washed out or incorrect, revisit the HDR settings and make adjustments as necessary.
How to ensure optimal power options for HDR-capable displays in Windows 11
To ensure optimal power options for HDR-capable displays in Windows 11, follow these steps:
- Select the Start button, then enter “settings” in the search bar.
- Click on “Settings” from the search results to open the Settings app.
- Within the Settings app, navigate to “System” and then select “Display.”
- Choose the HDR-capable display you want to adjust from the top of the screen.
- Enable HDR by selecting “Use HDR.”
- To play HDR content while running on battery power, click on “Battery options.”
- Check the box that says “Allow HDR games, videos, and apps on battery” or “Allow streaming HDR video on battery,” depending on your preference.
- If HDR was already turned on while your laptop was plugged in, it will now remain enabled when running on battery power.
Note: When HDR turns on or off after plugging or unplugging your laptop, the display may appear black temporarily.
Fixing Issues
If you’re experiencing issues with HDR display on Windows 11, here are some troubleshooting steps you can follow:
- Ensure HDR is turned on for your display or TV: Access the on-screen menu of your HDR display or TV by referring to the manufacturer’s documentation. Look for settings related to HDR and make sure it is enabled.
- Check display and hardware compatibility: Press the Windows logo key + R, type “dxdiag,” and hit Enter. In the DirectX Diagnostic Tool, go to the System tab and check the following:
- AdvancedColorSupported: This indicates if your display driver and display support HDR10.
- AdvancedColorEnabled: This indicates if HDR is currently turned on for your display.
- Monitor Capabilities: Look for “HDR Supported” and additional values such as BT2020RGB or BT2020YCC, which indicate HDR10 support.
- Adjust display settings for HDR: Go to Settings > System > Display and ensure that “Use HDR” is turned on. If you have multiple displays, select the HDR-capable display you want to adjust. You can fine-tune the brightness balance between HDR and SDR content by adjusting the SDR content brightness or HDR content brightness sliders.
- Troubleshoot dark SDR apps on HDR display: If some SDR apps appear too dark on an HDR display, try the following:
- Move the app to an SDR display if you have multiple displays.
- Adjust the SDR content brightness slider to a lower setting for external HDR displays.
- Restart the app if the brightness doesn’t change after adjusting the settings.
- Resolve color display issues:
- Ensure you have the latest graphics drivers installed from Windows Update or your PC manufacturer’s website.
- If using HDMI, try connecting your PC and display using DisplayPort instead.
- If HDMI is the only option, reduce the refresh rate or resolution settings to troubleshoot color fringes or incorrect color display.
- On HDR-capable laptops, ensure HDR is enabled even when running on battery power to avoid undersaturated colors after restarting.
- Night light and HDR compatibility: Night light settings can cause coloring issues on HDR displays. Adjust the night light strength or turn it off in Settings > System > Display > Night light.
- Choose a certified HDR display: When shopping for HDR displays, look for those certified for HDR and read reviews to ensure color accuracy.
By following these steps, you should be able to troubleshoot and resolve common HDR display issues on Windows 11.
- Resolving Error Code 0xA00F42A0: Fixing Windows 10 Camera Issues
- How to uninstall apps on Windows 10: Simple Guide
- Fixing Location Isn’t Set Up for Installing Games Xbox App Error in Windows 11/10
FAQ on How to turn on Windows 11 HDR
Q: What is HDR?
A: HDR stands for High Dynamic Range. It is a technology that expands the range of colors and contrasts in images and videos resulting in more vibrant and lifelike visuals.
Q: How do I know if my display is HDR-compatible?
A: HDR-compatible displays usually come with a “DisplayHDR” certification, such as DisplayHDR 400, 600, or 1000. Check your monitor’s specifications or manufacturer’s documentation for this information.
Q: Can I enable HDR on any Windows 11 system?
A: Enabling HDR on Windows 11 requires an HDR-compatible display and up-to-date graphics drivers. Check hardware supports HDR and that you have the latest drivers installed for optimal compatibility.
Q: How do I update my graphics drivers in Windows 11?
A: To update your graphics drivers: visit the website of your graphics card manufacturer (such as NVIDIA, AMD, or Intel). Download the latest drivers compatible with Windows 11 and follow the installation instructions provided by the manufacturer.
Q: What is Auto HDR for older games?
A: Auto HDR is an optional feature in Windows 11 that automatically enhances the visuals of older video games that do not natively support HDR. Enabling Auto HDR can provide a better visual experience for these games.
Q: How can I adjust HDR settings on Windows 11?
A: To adjust HDR settings on Windows 11: right-click on the desktop and select “Display settings” from the context menu. Then, scroll down and click on “Windows HD Color settings.” Here, you can customize various HDR settings, including brightness, contrast, and color gamut.
Q: How can I verify if HDR is enabled?
A: Launch an HDR-supported game or application and observe if the visuals appear more vibrant and have richer colors and improved contrast compared to non-HDR content. If needed, revisit the HDR settings and make adjustments accordingly.
Q: Do all applications and games support HDR on Windows 11?
A: Not all applications and games may support HDR on Windows 11. However, an increasing number of modern applications and games are designed to take advantage of HDR technology for enhanced visuals.
Q: Can I enable HDR on multiple displays?
A: Yes, if you have multiple HDR-compatible displays connected to your Windows 11 system, you can enable HDR individually on each display by these steps.
Q: Is HDR available on Windows 10?
A: While Windows 10 does support HDR, Windows 11 provides an enhanced HDR experience with improved features and compatibility. Upgrading to Windows 11 can provide a better HDR experience if your hardware meets the system requirements.
Conclusion:
Enabling HDR in Windows 11 enhances your visual experience by expanding colors and improving contrast on your HDR-compatible display. These steps include checking hardware compatibility, updating graphics drivers, enabling HDR in Windows 11 settings, and adjusting HDR settings if desired, you can ensure optimal HDR performance. Enjoy breathtaking visuals in games, videos, and applications as you unlock the full potential of HDR technology on your Windows 11 system.