If you’ve ever felt like your computer’s storage is a bit of a mess, with everything crammed into one space, then creating disk partitions might be the solution you’re looking for! It’s like having virtual compartments in your hard drive that keep things neat, and organized, and even help your PC run smoother. Windows 11 makes this process pretty user-friendly, and in this guide, we’re going to walk you through the steps to create disk partitions without technical jargon.
Getting the Basics Right
Before we dive into the steps, let’s get a grasp on what disk partitioning is all about. Think of it as dividing your hard drive into separate sections. Each section (partition) behaves like its own mini hard drive, with its own set of files, data, and even an operating system if you want. This helps keep things tidy and can even make it easier to set up your PC for different purposes.
Step-by-Step Guide
Alright, here’s the lowdown on creating disk partitions on Windows 11:
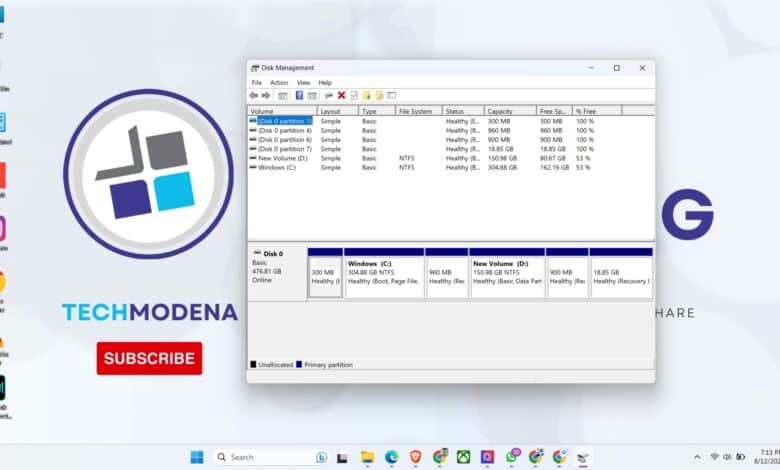
1. Open Disk Management:

- To start, right-click on the Start button. Look for “Disk Management” and click on it. You can also press
Windows + Xand choose “Disk Management.”
2. Find the Right Disk:
- In the Disk Management window, you’ll see a list of disks and their partitions. Make sure you’re selecting the right one. Be careful because we’re talking about making changes here, and that can mean saying goodbye to data.
3. Shrink the space:
- Right-click on the volume you want to shrink (usually it’s the C: drive). Choose “Shrink Volume.”
- Now, type in the amount of space you want for your new partition, either in MB (megabytes) or GB (gigabytes). The system will let you know how much you can shrink.
4. Create Your New Partition:
- After you’ve shrunk the volume, you’ll see some unallocated space. Right-click on it and choose “New Simple Volume.”
5. Wizard Time!:
- A wizard will pop up. Hit “Next” to get things rolling.
6. Set the Size:
- Now you’re going to specify the size of your new partition. If you’re creating more than one partition, divide up the space as needed. Click “Next.”
7. Give It a Letter:
- Choose a drive letter for your partition. You can also mount the partition in a fancy NTFS folder if you want. Then, you guessed it, click “Next.”
8. Format the Partition:
- Choose the file system (usually NTFS), set the allocation unit size (the default is good for most folks), and give your partition a label (name) if you feel like it.
- Check the “Perform a quick format” box to speed up the formatting. Click “Next.”
9. Finish the Wizard:
- Take a quick look at your choices and click “Finish” to create your brand-new partition.
10. You’re Done!: Windows will do its formatting magic, and once it’s done, you’ll see your new partition listed in Disk Management.
Read More :
- How To Fix The Something Went Wrong Office Error On Windows
- How to Use BlueStacks to Run Android Apps on Windows
- How to Fix WSReset.exe Not Working on Windows
The Perks of Disk Partitions
Creating these partitions isn’t just about tidying up; it brings some real benefits:
- Get Organized: Now you can keep different types of data in their own separate areas. No more mixing work files with personal stuff!
- Boost Your PC: If you store data smartly on different partitions, your system might run faster and smoother.
- Protect Your Data: If one partition has issues, it’s less likely to affect the others. It’s like having a built-in data safety net.
- Try New Things: Want to experiment with different operating systems or set up a dual-boot? Partitions make it much easier.
- Backup Like a Pro: With organized partitions, backing up your data becomes a breeze.
Things to Keep in Mind
A few important notes as you embark on this partitioning adventure:
- Backup is Your Buddy: Always have a backup of important data before doing anything with partitions. Safety first!
- Be Smart with Sizes: Allocate space based on your needs. Too much or too little can cause trouble down the road.
- Hands-Off System Partitions: Don’t mess with the partition where Windows lives. It’s a no-go zone.
- Handle system files with care. Tweaking or deleting system-related partitions or files is a one-way ticket to PC trouble.
Wrapping It Up
Creating disk partitions is like giving your hard drive a makeover. It helps keep things in order and even gives your PC a performance boost. Windows 11 has made it pretty easy to do, and with this guide, you’re all set to make those partitions and take control of your digital space. Happy organizing!