We’ll talk about how to Fix Margins on Google Docs in this article. A fantastic tool for producing and sharing documents is Google Docs. However, there may be instances when your document’s margins are incorrectly set up, making your content look crammed or dispersed. Although this can be annoying, Google Docs’ margin adjustments are fortunately simple.
Fix Margins on Google Docs
Check your current margins
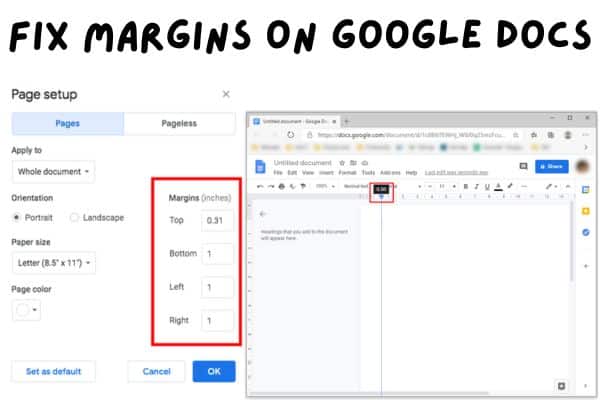
The first step to fixing margins on Google Docs is to check your current margins. To do this, go to the File menu and click on “Page setup.” A dialog box will appear, showing your current margins. By default, the margins are set to 1 inch on all sides. If you’ve changed the margins, you’ll see your new settings here.
Adjust margins
To adjust margins, you can either enter new values in the margin fields or use the sliders to adjust the margins visually. If you want to change the margins for the entire document, make sure the “Apply to” option is set to “Whole document.” If you only want to change the margins for a specific section of the document, select the appropriate option from the “Apply to” drop-down menu.
Change margin units
By default, margins in Google Docs are measured in inches. However, you can change the unit of measurement to centimeters, millimeters, points, or picas. To change the unit of measurement, click on the drop-down menu next to the margin fields and select the unit you prefer.
Set custom margins
To set up your own margins, follow these steps:
- Choosing “Custom” from the drop-down menu under “Apply to”.
- You can do this to set distinct margins for the document’s top, bottom, left, and right sides.
- Simply fill out the necessary fields with the desired values, and then click “OK” to save your adjustments.
Adjust margins for specific sections
You can change the margins for a certain portion of your document by doing the following:
New section break creation.
For a new section break:
- Go to the “Insert” menu and choose “Break.”
- Select your preferred break type (such as “Next page” or “Continuous”).
- Then press “OK.”
- By doing this, a new section of your document will be added with its own margins.
Adjust margins for headers and footers
Follow these steps to alter the margins for the headers and footers in your document:
- Make the “Insert” menu selection “Header & Footer”.
- After adding a header or footer to your document you may modify the margins by selecting the “Margins” button in the toolbar.
Reset margins
Simply choose “Page setup” from the “File” menu if you’ve changed your margins and want to restore them to their original settings. The “Default” button should be clicked after selecting the “Margins” tab. The margins on all sides will be reset to 1 inch by doing this.
Here are some shortcut fixes to adjust margins on Google Docs:
Use keyboard shortcuts:
Using keyboard shortcuts margins can be changed quickly. To enter the “Page Setup” dialogue box, use “Ctrl + Alt + P” on Windows or “Command + Option + P” on a Mac. After making your necessary margin adjustments, click “OK” to save your changes.
Use margin presets:
You may easily apply a number of margin settings in Google Docs with only a few clicks:
- Go to the “File” menu and choose “Page setup” to access these presets.
- When you get there, click the “Margins” tab and choose one of the pre-set settings, like “Normal” or “Narrow.”
Copy and paste margins:
You may easily copy and paste margins that you’ve already set up in one document into another if you wish to use the identical margins in both documents. Press “Ctrl + C” on a computer running Windows or “Command + C” on a Mac to copy the text with the desired margins from the document. Once there, press “Ctrl + V” on a Windows computer or “Command + V” on a Mac to paste the text into the document where you want to apply the margins.
Use margin templates:
If you have a specific margin layout that you use frequently you can save it as a template for future use. To create a margin template, go to the “File” menu and select “Page setup.” Adjust the margins to your desired settings and then click on the “Set as default” button. From there, any new documents you create will use your saved margin settings as the default.
By using these shortcut fixes, you can save time and quickly adjust margins in Google Docs.
FAQ
How can I change Google Docs’ margins?
In Google Docs:
- Choose “Page setup” from the “File” menu to alter the margins.
- Select “Margins” from the drop-down menu
- Then change the margin settings to the desired numbers.
Why don’t my margins in Google Docs work?
There could be a lot of causes for your margins in Google Docs to stop working. Make sure your printer’s settings are set up properly and that the correct page size is selected. To prevent the margins from shifting, make sure there is no material inside the margins.
Can I change the margins in Google Docs for only one page?
In Google Docs you can change margins for just one page. To do this:
Navigate to the page where you want to adjust the margins
Then select the “Page Setup” toolbar icon.
After that, change the margins to the values you want.
How can I reset Google Docs’ margins to their default values?
Go to the “File” menu and choose “Page setup” to restore the margins in Google Docs to their default positions. After that, select “Normal” from the list of pre-set settings under the “Margins” tab. To make your own custom margins the default for all future papers, set them yourself and then select the “Set as default” button.
Can I create a template in Google Docs to save margin settings?
Yes, you may store margin settings in Google Docs as a template. To do this, go to the “File” menu and choose “Page setup.” Click the “Set as default” option after adjusting the margins to your preferred settings. From that point forward, your saved margin settings will be the default for all new documents you produce.
- Gmail Keeps Stopping How do I Fix it
- How to fix Gmail notifications on Android
- How to see blocked emails on Gmail
- How to fix formatting in google docs?
Conclusion
Fixing margins on Google Docs is easy and can be done in just a few steps. By checking your current margins, adjusting margins, changing margin units, setting custom margins, adjusting margins for specific sections, adjusting margins for headers and footers, and resetting margins, you can ensure that your document looks polished and professional. With these tips, you’ll be able to create beautiful documents that are easy to read and understand.